

Whether you are creating a website for your business or you just set up your blog, you are here because after installing WordPress you are wondering, “What now?”
Before you start going crazy with creating new pages for your website or hammering out posts for your blog, let’s start with the basics of setting up your WordPress site. This is my list of 9 things you can do right now after installing WordPress.

Here’s what you should do after installing WordPress:
1. Change Site Title, Tagline, and Timezone
Let’s set up some crucial elements on your WordPress site in General Settings. From the WordPress dashboard, navigate to Settings > General. Here let’s update your Site Title, Tagline, and Timezone.
Let’s start with updating your Site Title. This will be the name of your blog or website.
Next, update your Tagline. Your tagline is important because it tells us (and Google) what your website is about. So make sure to include strong keywords that describe your business or blog. For example, let’s say you have a DIY blog that focuses on home projects, the tagline could be “DIY Home Project Tutorials.”

Next, make sure to update your Timezone. This important when it comes to scheduling blog posts to be published. If you have the wrong time zone, then you don’t quite know when your post will be published, unless you want to do timezone math. This is no fun when you thought your post was supposed to be published already, and it turns out it’s scheduled for 8 hours later.

Last, make sure you save the changes you just made before you move on.
2. Permalinks
Let’s change your permalinks. A permalink is the permanent URL or link of a blog post on your WordPress site. For example, the permalink of this blog post is https://blogthere.com/steps-after-installing-wordpress.
It’s important to set the structure of your permalinks right away, because if you change it after you’ve started blogging you will have broken links and will have to set up a redirect for your links. For example, if you have a post on your website that is getting a lot of traffic from Pinterest, and then you go and change your permalink structure without doing a redirect, your website visitors are making it to a 404 error page instead of the intended page and now you’ve lost that visitor.
To set your permalink structure, go to Settings > Permalinks. The default setting in WordPress for permalinks is Plain, which just uses a number at the end of the permalink to identify your post.

Having a number in the permalink is not as SEO friendly as actually having keywords in your permalink structure. So, I recommend you choose the Post Name option and Save Changes.

Choosing Post Name as your permalink structure means that your permalink only has your post name in the URL. Having only the post name as your permalink means that you’ve cut out the clutter. There are no dates in the permalink, which means that your not potentially losing a visitor because they realize that the blog post is not current. Additionally, using the post name allows you to have complete control over what the link will be. This is important because now you can optimize your permalinks to be SEO friendly.
This post may contain affiliate links. I may earn a small commission from purchases made through them, at no additional cost to you. Please see my Disclosure Policy for more details.
3. Choose a Theme
Now it’s time to jazz up your blog or website with a theme. The theme establishes the appearance and layout of your site. There are both free and premium WordPress themes out there to fit any style you can imagine.
You can find free WordPress themes on the WordPress theme directory. To access the directory directly from your WordPress Dashboard, go to Appearance > Themes > Add New.
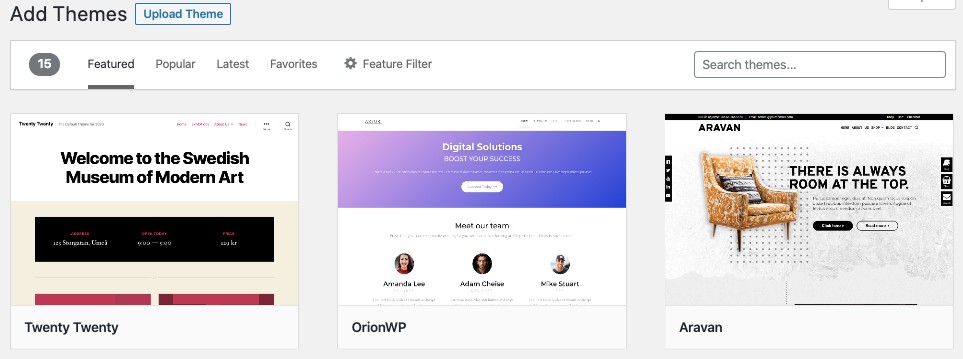
You can also discover thousands of premium themes on ThemeForest or Creative Market. Premium themes allow for more customization, support, functionality, and updates.
Personally, I love the Astra theme, and that is what I currently use on my site. It’s super customizable and lightweight, so it keeps your blog running fast. Check out my post on how to download it for free.
Choosing your theme is obviously based on your budget and aesthetics, but also consider if the theme itself is easy for you to navigate and customize.
Once you choose your WordPress theme, it’s time to install it. If you choose a theme from the WordPress theme directory, you can easily install and activate it with just a few clicks. Select the theme you want, click Install, and then Activate once installed.
If you choose a premium theme from another website, follow the directions from the developer in uploading it to your site. Essentially, you are uploading the theme file to your site by going to Appearance > Themes > Add New > Upload Theme. Once successfully loaded, make sure to Activate your theme.
4. Delete Sample Posts, Pages, and Themes
Your WordPress site comes with sample content. This content is only here to show what you can do with your new website. It’s a placeholder only and should be deleted.
Delete Sample Post, Page, and Comment
From the WordPress Dashboard, navigate to Posts > All Posts. You’ll see the sample post “Hello world!” here. You can delete it by selecting the Trash option.
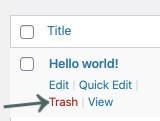
Additionally, you can delete any sample pages the same way. Head over to Pages > All Pages. You can delete “Sample Page” by selecting the Trash option.
Don’t forget the sample comment! Go to Comments and yet again delete the sample comment by selecting the Trash option.
Delete the Default Theme
If you don’t plan on using the default theme in WordPress, make sure to delete it once you’ve selected the theme you wish to use.
Navigate to Appearance > Themes. Here you can delete any unwanted themes by selecting the theme you wish to delete, then select the delete option on the bottom right corner. By the way, you cannot delete the active theme.

It’s important to delete unused WordPress themes for two reasons. First, themes take up space. Deleting any unused themes will help save space and speed up your site. Second, if you don’t update your unused themes, your blog can be susceptible to security breaches.
5. Installing and Removing Plugins
Plugins are pretty essential for most blogs and websites. They have the ability to increase the functionality of your WordPress site. From helping you with SEO and page building, to protecting your WordPress website and having the ability to have e-commerce website, plugins help your WordPress site function exactly how you need it for your online business or blog.
You can discover what plugins are available by going to Plugins > Add New. This is the WordPress plugin directory. Additionally, you can find third-party plugins on developer websites or other sites like CodeCanyon.
Remove Plugins You Don’t Use
Just like with themes, delete the plugins you don’t need. Just because you can download any plugin, doesn’t mean you should. Make sure every plugin you have is contributing to a necessary function on your WordPress site, if not delete it. Having extra plugins on your blog weighs down your site in terms of speediness, and adds a potential vulnerability to the security of your website.
To remove a plugin that you don’t need, like the default plugin on WordPress “Hello Dolly,” go to Plugins > Installed Plugins. Make sure the plugin is not activated. If it is activated, simply click on Deactivate.

Now, once the plugin is deactivated, click on Delete.

6. Set Up Google Search Console and Google Analytics
Setting up Google Search Console and Google Analytics are two simple steps that will allow you to see how many visitors are making it to your WordPress site, who is viewing your website, and how they made it there.
You may think: “I don’t have any content yet, so I don’t need to analyze my website traffic yet.” But setting it up now means when you are ready to learn more about your audience insights, the data is already there. Check out my posts for quickly setting up Google Search Console and Google Analytics for your WordPress blog.
7. Update the Default Category
Every blog post on WordPress is filed under at least one category. Uncategorized is the default category. So when you write a post and don’t change the category, it is automatically placed in the Uncategorized category. It’s not very professional or easy to navigate from your viewers’ standpoint.
Let’s fix this! From the WordPress dashboard, go to Posts > Categories. Then Add New Category. Create a category that you think will be your most used. For example, if you have a book review website, make a Book Reviews category, or if you have a lifestyle blog, add Lifestyle as your category.
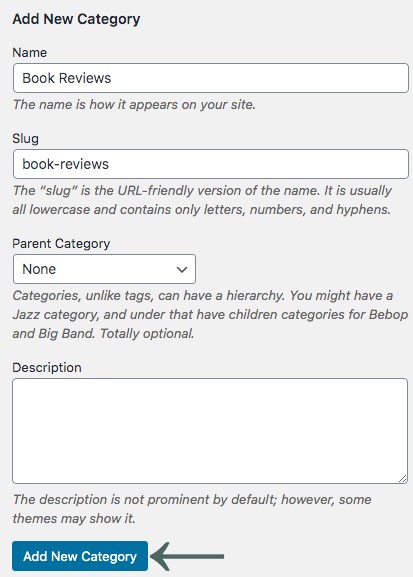
Once you’ve added the category you think will be your most prominent, go to Settings > Writing. From here, you can select your default category.

Now Save changes.
Now go back to Posts > Categories. Find the Uncategorized category, and simply delete it.

RELATED: HOW TO REMOVE UNCATEGORIZED FROM WORDPRESS
8. Backup Plan
Having the ability to backup your WordPress site is essential.
Things happen! Your website got hacked, you accidentally deleted something you shouldn’t have, or perhaps even an update you did broke your blog. This is where a backup plan is necessary. If you had a backup, all you had to do was restore it and your WordPress site is back as it was!
Some hosting providers provide daily backups, and you don’t really have to worry about doing a backup. My blog’s host provides daily backups. Plus, they make it easy for me to do my own backup if I wish.
You can also download a free plugin to help you do a backup of your WordPress site, like Updraft.
9. Pinterest Setup
Pinterest is an amazing source for traffic to your website. Get yourself set up right away with Pinterest by creating a business account on Pinterest, claiming your WordPress site on Pinterest, and enabling rich pins.
What’s Next?
Now that you took these important steps after installing WordPress, the hard, yet fun work begins. It’s time to get building your website or blog!
If you need any help creating your WordPress site, you can work with me to build a custom website or blog.